Tuesday, May 22, 2012

Somborka White Peppers

My neighbour gave me some somborka white pepper seeds from Kosovo (where he is from). This got me interested in finding out what I could about growing peppers. My neighbour said to put the seeds in a glass of water overnight and only plant the ones that have sunk to the bottom in the morning. I am also trying to germinate some seeds in a wet/damp paper towel (not dripping with water but wet) & then I put that paper towel in a ziploc bag, not sealed up. I am also trying a paper towel method with chamomile tea. The instructions on the internet said to make a cup of chamomile tea (steep 5 mins) and then use that same bag to make a second cup of tea. Use the mild tea to wet a folder paper towel on a saucer. Place the seeds on the paper towel and cover them with another folded paper towel, dribble some more tea over the paper towel...again, quite damp/wet. Put the seeds in a warm place. I have mine in an aquarium that I use as a mini greenhouse. Don't let the paper towel dry out...when it is starting to dry, dribble more tea on the towel. Here is the description I found on the somborka pepper: mid-season peppers that are very productive and have mild hot flavor that is so pleasant in fresh salads or salsa. Fruits ripen from light green to light yellow to light red when fully mature. Medium size, bell/conical shape, thick walls. 

Pepper tidbits: all peppers are perinnials (I didn't know that - good to know). Also, don't plant them in peat pots. No one knows why but they just don't survive...I guess peppers don't like peat. I found other articles that said make sure not to plant them in a soil that has a lot of peat. It may have something to do with how wet the peat stays, encouraging mold. I also read that the hotter the pepper, the longer it takes the seed to germinate. I guess I will have to be patient...hmmmm?? I'll keep you posted.

Update: out of 10 seeds put in the glass of water last night, 7 sunk to the bottom. Pretty good...70%. Supposedly, the ones that sink are viable seeds and you are supposed to just toss the ones that are still floating (for this particular type of seed)

I Still Play In The Dirt!!!

I have a confession - I still play in the dirt. There is just something special about growing something yourself. I get a lot of enjoyment from sprouting seeds and checking on them each day to see the progress they have made. The very best part , of course, is when you get to eat something that you actually grew yourself. The top photo is a valley grown herb - hot & spicy oregano. I put some in my last batch of spaghetti sauce and I think that is what gave it that extra zip. I actually took several herbs out of my bucket (chives, basil, oregano,rosemary & thyme)...just bits of each..gave them a little rinse and balled them up into my loose tea holder thingie. I am talking about a little silver tea holder that has a little chain on it that you are supposed to hang on the side of your tea cup. I bunched all of the spices up, put it in the tea holder thingie and hung it on the inside lip of the crock pot into the sauce. It works really well and you don't have to bother chopping any of the herbs up...super easy (I am a big fan of super easy)

some bush beans which are like summer candy, in my opinion. I planted a few in a pot and the rest are going in my raised bed...yummy!!!

Sunday, May 20, 2012

Eggshell Planters


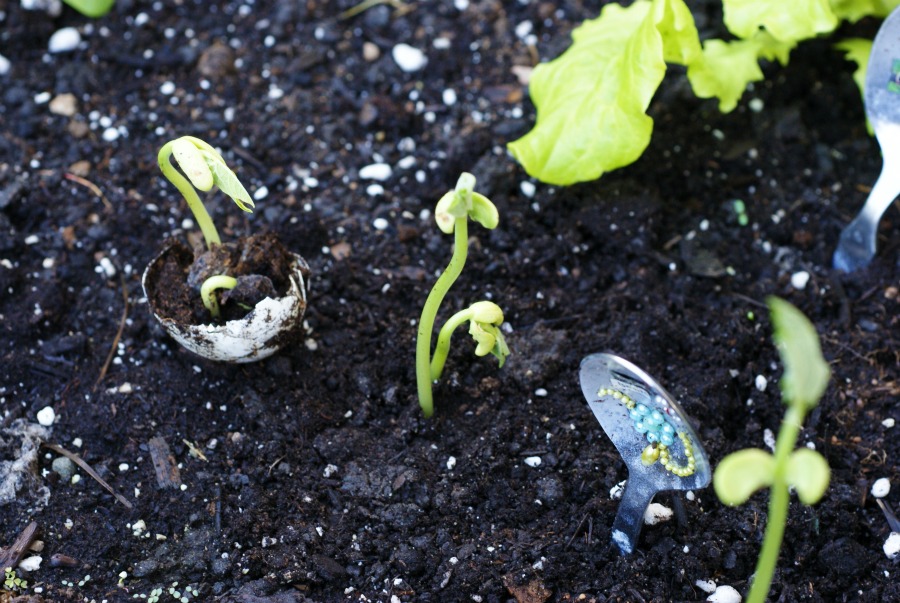
Eggshells are perfect for starting seeds. I just rinsed out the eggshell a little (you don't have to) and added some soil, moistened it, added seeds, covered with a little more soil & moistened the top of the soil.  When the plant is ready for the outside garden, just transplant them straight into the soil, shell and all. This is great for beans and sunflowers because they don't like to be disturbed. I just read a tip on the internet that said don't forget to crack and peel away the bottom of the eggshell so the roots can spread out....oops..wish I had read that "LAST WEEK". I hope the little roots can crack on through to the other side.


DIY Garden Markers


I have tried several ideas for garden markers. I bought spoons from Value Village at .25 each and cut out words, glued them on, added some stickers, sprayed them with a sealer...however; didn't wait the 24 hour time period that I should've....big rain storm, spoons got discolored..oops. I tried to use a sharpie to write on wooden spoons, but the markers bled. My son-in-law suggested that I use pencil and then spray the sealer over that...it worked. I was wishing that I had a small child to print on the spoons for me.....I think that would be even better.

Friday, May 18, 2012

OUR FOOD Project - I am so excited - I have a plot in our new Community Garden!!!

This is a video that I tried to share the other day on this blog, but for some reason, I could not "share"..just wouldn't work. I finally abandoned my efforts to do so. I have been wanting for a time to be part of a community garden & contacted a farm last year, but they did not have any openings, so I continued my search online. I decided to send off an email just to try to get some info. I received an email back right away and a phone call the next day putting me in touch with some folks who were just getting a new Community Garden going in my area. My name was put on a waiting list and apparently the interest was so great, it was felt that some people may have to share beds if need be. Didn't matter to me, I just wanted to be a part of it. Anyway, I received a phone call back yesterday saying that I had a plot - 6' x 12' for $10 per year....are you kidding me??? I went down and paid today and saw the carpenters hard at work building the raised beds and filling them with organic earth. The funny thing is, I was asked on the phone if I was on Facebook and if so, told to check out the new page on the BLT Community Garden. The video I had been trying to upload 2 days ago is the same one they have featured on their page.....so cool!!! I am pretty excited about the whole idea and can hardly wait to get planting & sharing.

All Decked Out!!!

My herb bucket is starting to come alive with my garlic chives, lemon thyme & lavender (perinnials from last year) & my newly planted nasturtiums & curly parsley (annuals). On the back deck, I have some pots of different types of leaf lettuce ,a few bush beans and a pot of nasturtiums. On the front deck, I have another pot of lettuce and also a pot with tarragon & purple basil planted.

attempting to make different garden markers....some of the markers bled through even though they are not supposed to and even with a sealer over the top...oh well!!..they work.

I have a few "happy places" but definitely digging in the dirt on a gorgeous spring day is way up there on the list.